Managing your cloud resources from the CLI
In this short tutorial I will demonstrate how to create and terminate virtual machines from the command-line interface.
In OpenStack, there are two interfaces for managing your cloud resources. One is via the web-based Openstack Dashboard, the other is via the Openstack Client (OSC), a unified command-line client that combines the older openstack utilities into a single shell.
This was tested using using Ubuntu 14.04.
Installing the client
The first step is to install the necesary Openstack clients and supporting libraries.
On Ubuntu, Debian or other APT based distributions:
sudo apt-get install python-pip
sudo pip install python-openstackclient
On Fedora, CentOS or RHEL:
sudo yum install python-pip
sudo pip install python-openstackclient
Note: If you do not want to override locally installed python-packages, look into using virtualenv to create a separate python environment.
Configuring the client
In order to use client, you need to set up some necessary environment variables. We recommend storing these variables in a file you can use at a later time. Here we create a file called "osc-zetta.io" as follows:
sudo vi ~/osc-zetta.io
export OS_AUTH_URL="https://identity.api.zetta.io/v3"
export OS_USERNAME="<USERNAME>"
export OS_PASSWORD="<PASSWORD>"
export OS_REGION_NAME="no-osl1"
export OS_USER_DOMAIN_NAME="<DOMAIN>"
export OS_IDENTITY_API_VERSION="3"
export OS_PROJECT_NAME="standard"
export OS_PROJECT_DOMAIN_NAME="<DOMAIN>"
In the above, the OS_USERNAME is the username of the account you created during initial registration, OS_PASSWORD is the password you set and OS_USER_DOMAIN_NAME/OS_PROJECT_DOMAIN_NAME is the domain you created. The OS_PROJECT_NAME is here set to "standard" wich is the default project created during the initial setup. Remember to replace the values with your own.
Now you can set the enviroment variables by sourcing the above script into your current shell:
source ~/osc-zetta.io
At this point, you should be able to use the client. Verify that it works by listing your servers:
openstack server list
If it shows an empty result (or a list of instances), it indicates that everything is okay. If you recieve an error message like "You must provide a username via either --os-username or env[OS_USERNAME]" it means you have not set your environment variables correctly.
Setting up a public key
Most images will create a default user and inject a public SSH key into the instance during the boot-process, allowing you to authenticate to the system. Ensure that you have a valid key set up. To check if there is any keypairs configured, use:
openstack keypair list
If the list is empty, create/upload a new public key.
If you have an existing SSH public key, upload it to openstack.
openstack keypair create --public-key ~/.ssh/id_rsa.pub "Your Name"
If you do not have a valid SSH private/public keypair, generate one using "ssh-keygen" or you can get one generated by Openstack automatically:
openstack keypair create "Your Name"
Remember to save the resulting private key, it will match the public key stored in Openstack and is required to authenticate. Alternatively redirect the output directly:
openstack keypair create "Your Name" > ~/.ssh/id_rsa
Launching an instance
Before we create a virtual machine, we need to gather some information.
To get a list of all publicly available system base images, we query the Glance API:
openstack image list
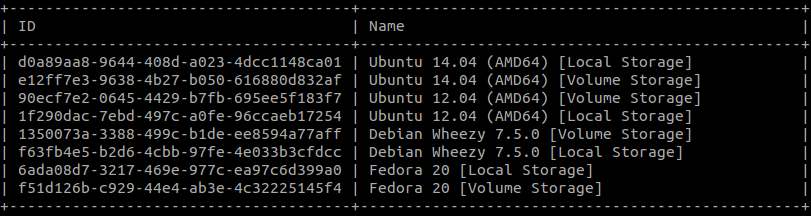
Note that this list will also include images that other users of the platform has marked as public.
Make a note of the ID of the image you want to deploy. Here we want to deploy the Ubuntu 14.04 on Local Storage, so we make a note of ID "d0a89aa8-9644-408d-a023-4dcc1148ca01".
Now we need to decide what type/flavor of instance we want to launch, so we ask Nova about flavor types.
openstack flavor list

Since we are only testing, we use the smallest available machine, "m3.medium".
Now we have all the details we need to launch a virtual machine:
openstack server create --flavor m3.medium --image d0a89aa8-9644-408d-a023-4dcc1148ca01 --key-name "Your Name" "server01.example.com"
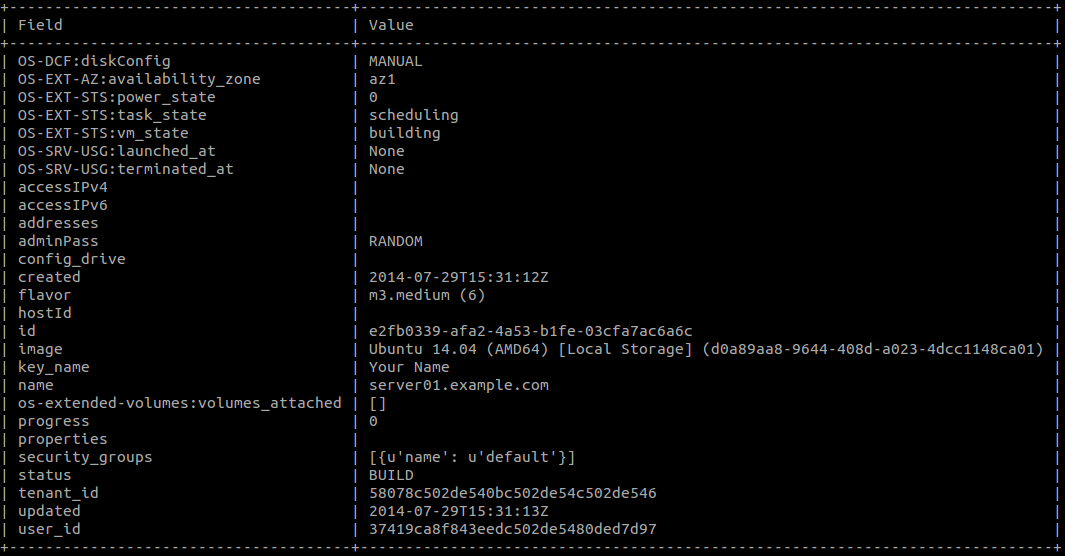
The instance is now scheduled for creation and will be in the BUILD state until it has booted.
If you are using a popular system image that is cached locally on the hypervisors, your instance should start within a few seconds. If you are using a larger image, the image will be copied over the network from the Glance image store. This process can take a long time.
To check the current status:
openstack server list

When it is marked as ACTIVE it should be running.
To view the bootlog output from the instance, you can use the console log show command. This also helps you discover any problems with cloud-init or other issues you might have.
openstack console log show server01.example.com
Connecting from the internet
Due to our fully virtualized network architecture, instances have a private (RFC1918 with NAT) IP address, and is not reachable from the internet.
To reach the machine from the internet you must allocate a floating IP from the public IP pool.
First we will check if we have previously allocated any addresses that are unused:
openstack floating ip list
In our case, this list is empty and we need to allocate one from the Public pool.
openstack floating ip create "Public"
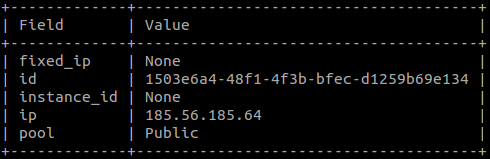
When we now look at the list of floating ip addresses, we see that we have one unallocated.
openstack floating ip list

We can now allocate this to our instance.
openstack ip floating add 185.56.185.64 server01.example.com
The instance should now be available from the internet. The default security group policy will allow incoming TCP traffic to port 22 (SSH), 80 (HTTP), 443 (HTTPS) and 3389 (RDP).
Logging into the instance
By default, most images are configured to have a default user created if none is created a startup using cloud-init userscripts, with the public ssh key copied into it. Ubuntu uses "ubuntu", Fedora uses "fedora" and Debian uses "debian".
We should now be able to log into our server, provided the SSH private key is correctly installed.
ssh ubuntu@185.56.185.64
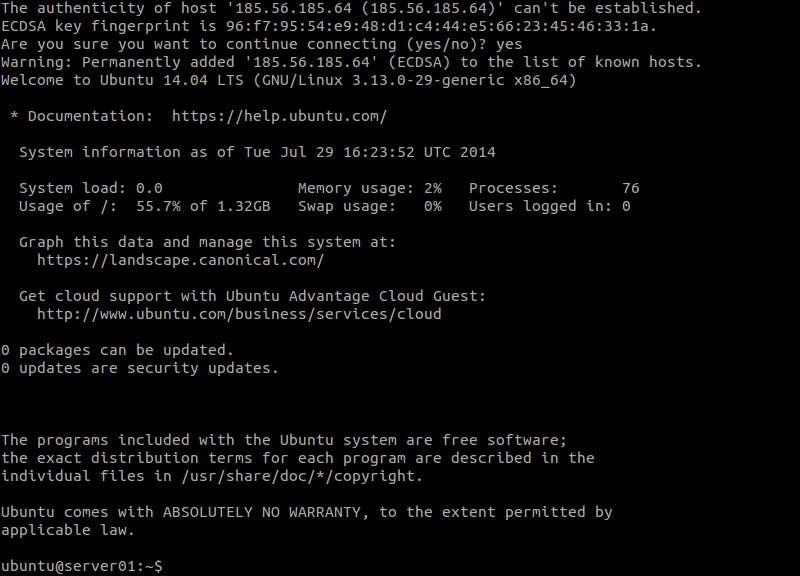
Congratulations, you are now up and running!